Image files in product imports
ShopWired's category and product import systems import images for your products when they are hosted on a server and can be accessed via a . For example, https://cdn.ecommercedns.uk/files/5/210875/9/4827489/logo.png
If you are using the product or category import systems to create products with images that are not hosted on a server and are on your device's hard drive, you can use ShopWired's image hosting service to create URLs for them:
- Upload the images from your hard drive to ShopWired's image hosting service
- Obtain the URLs for each image
- Populate these images into your category/product import spreadsheet file
You must also ensure:
- Images are either
.jpg,.png,.gifor.jpeg - Do not use
.webpimages here - Image heights are not greater than 6000px
- Image widths are not greater than 6000px
- Image file sizes are not greater than 4MB
Uploading your images
Uploading your images
To upload your images to ShopWired's image hosting service:
- Gather all your images into a single on your device's hard drive
- Ensure that all images are in a single folder and that the folder doesn't contain other folders with images
- the folder
- Navigate to http://image-import.shopwired.co.uk and select the zipped folder from your device
- Enter your email address (for notification when the upload has been processed) - this is optional but recommended for larger imports (over 50MB)
- Select
upload files - Keep the browser window open whilst the zipped file uploads
The upload processes in 3 stages:
- Your file uploads from your device to the ShopWired server
- The ShopWired server unzips the file
- The ShopWired server processes the images
Once the upload is complete the website will display a unique upload ID for the file, for example 1016:
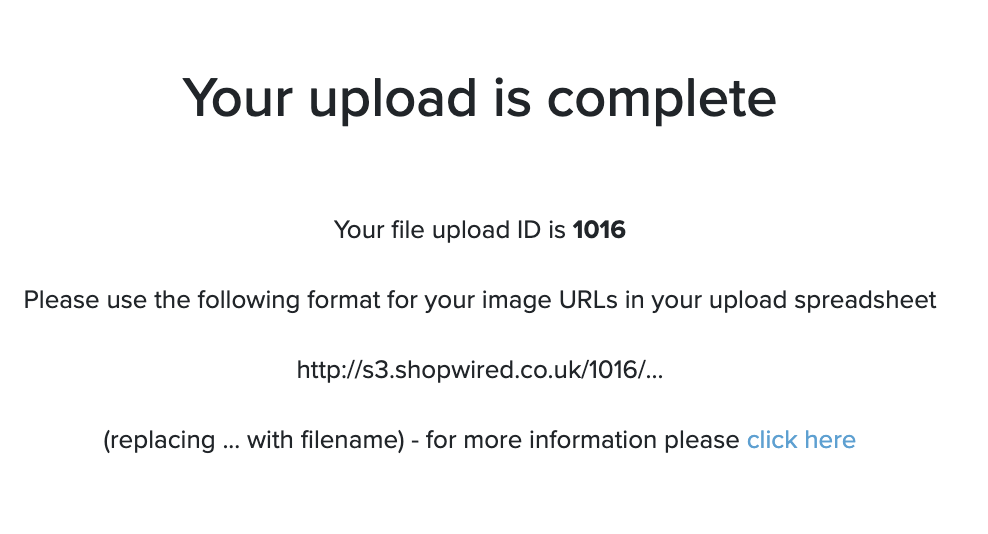
Make a note of this ID, you'll use this in the next step.
Populating your category/product import
Populating your category/product import
Once you've uploaded your images to the ShopWired image hosting service, you'll use the unique upload ID to formulate the URLs to use in your category or product import.
- The URLs of images on the ShopWired server will follow this formula
http://s3.shopwired.co.uk/{{ ID }}/{{ filename.jpg }} {{ ID }}is the unique ID of the upload{{ filename.jpg }}is the filename and- Your own images will be accessible at URLs that follow this format, for example if your upload ID is
1016and one of the file names iswhite_nike_trainers.pngthe URL for the image file will behttp://s3.shopwired.co.uk/1016/white_nike_trainers.png
If your import file doesn't contain file names
If you haven't already input the file names for images into your import file, you can write in the URL for each image according to the specification above.
If your import file does contain file names
If you have already input file names into your spreadsheet, you can use a within your spreadsheet editing software to add in the beginning of the URL, for example ="http://s3.shopwired.co.uk/{{ ID }}/"&A1.
You can to help you.
| ID | ... | Image URL/File Name 1 |
|---|---|---|
| 123456 | ... | http://s3.shopwired.co.uk/1016/white_nike_trainers.png |
| 123457 | ... | http://s3.shopwired.co.uk/1016/white_nike_trainers.png |
Special characters in file names
Special characters in file names
URLs cannot contain special characters (for example: ø, ü, é). If your URL does contain special characters, you will first need to change that character to the URL code for it.
To obtain the URL code for special characters you can use a tool such as Graphemica. On their website, select the special character you need to use and under Code copy the URL escape code. For each instance of the special character in your URL, you will need to replace it with the URL escape code.
Alternatively, you can to help you.