Kashflow
If you use the Kashflow online accounting platform to manage your business's accounts, you can connect your Kashflow account to your ShopWired account so that orders placed on your website will be automatically exported to Kashflow as invoices.
To connect your Kashflow account to your ShopWired account, you must first install the Kashflow app:
Enabling API access
Enabling API access
Once you've installed the Kashflow app, you'll need to enable API access within your Kashflow account.
From within Kashflow:
- Select Apps from the left menu
- Select API Settings in the top right-hand corner
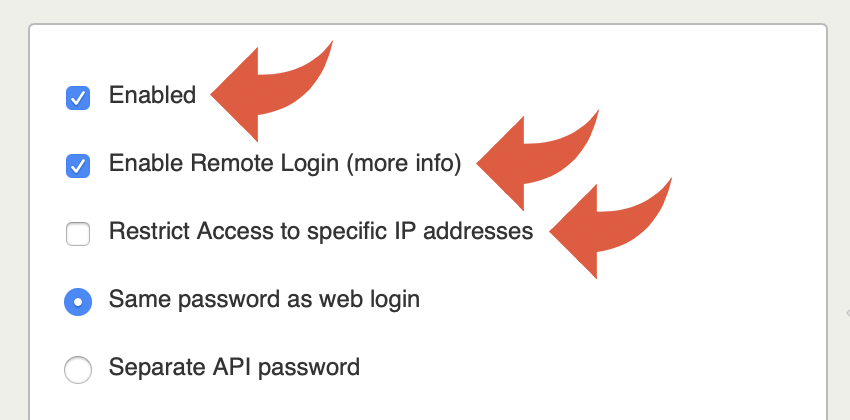
Ensure that the following settings are configured:
- Enabled is selected
- Enable Remote Login (more info) is selected
- Restrict Access to specific IP addresses is not selected
Kashflow settings
Kashflow settings
In the Kashflow app configuration page in ShopWired, configure each of the available settings (each setting is explained below).
Navigate to Apps > Manage > Kashflow and use the Kashflow settings section.
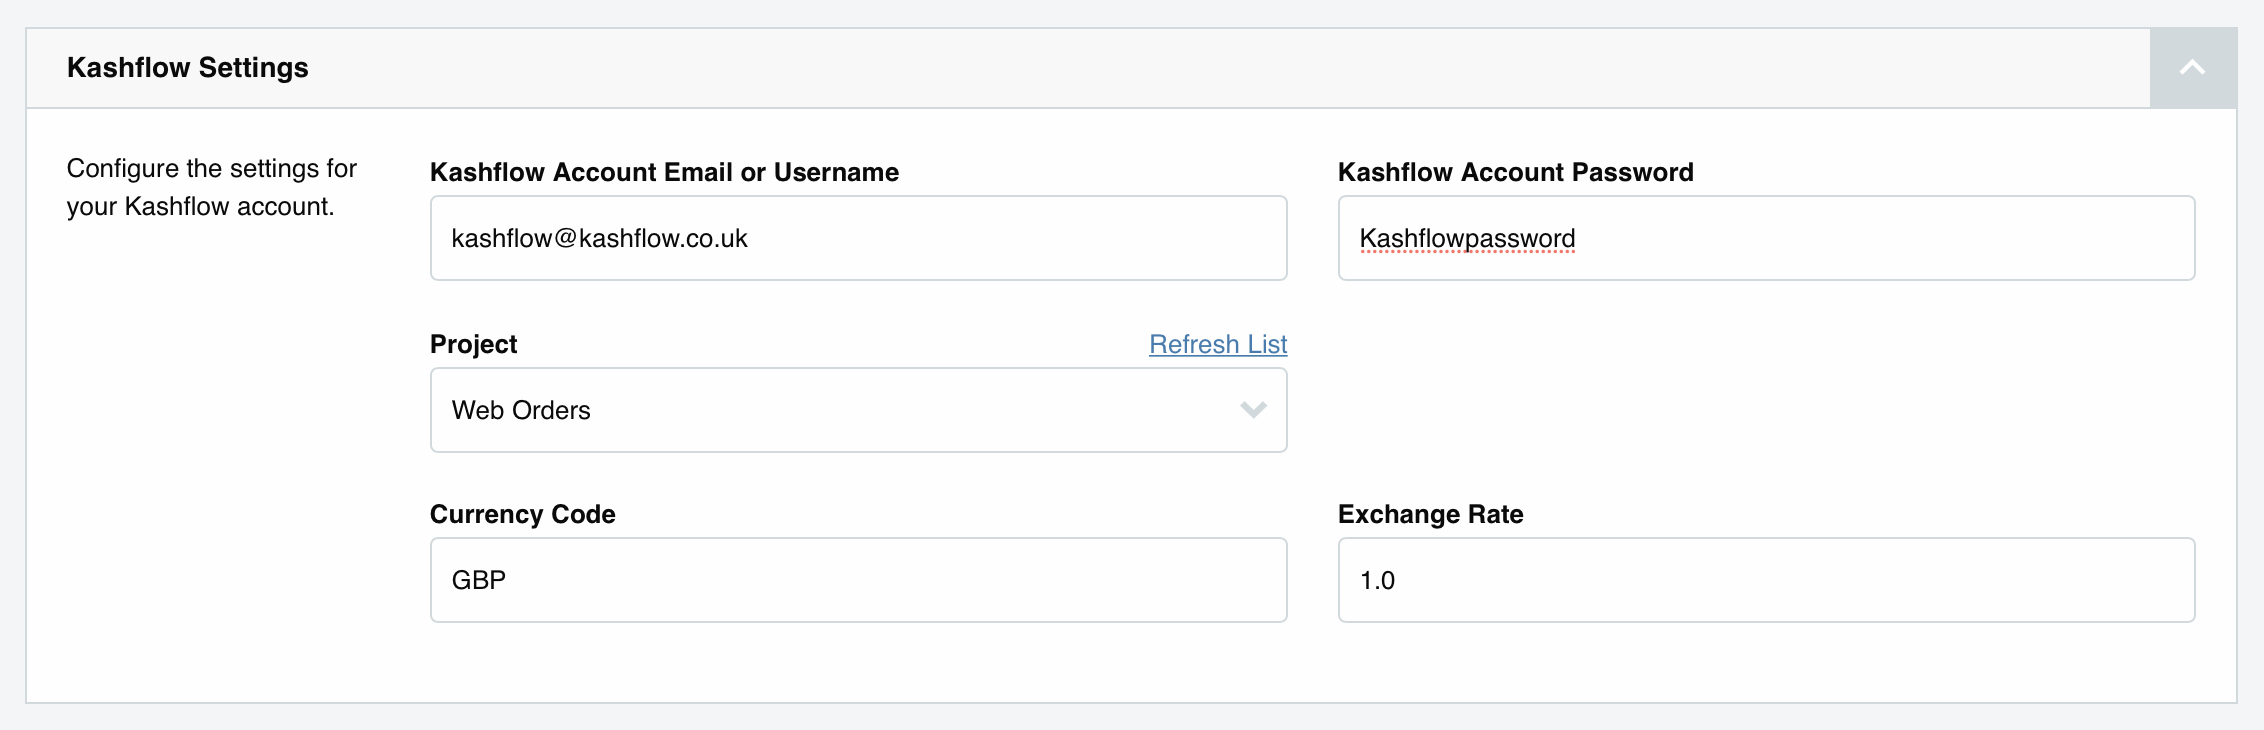
Kashflow login details
Enter your Kashflow account username and password.
Projects
Kashflow uses a system of . If you haven't already done so, you'll need to create a project within your Kashflow account for ShopWired orders to be assigned to.
Once you've created at least one project on your Kashflow account, you'll be able to select it from the project setting. You can select refresh list to refresh the list of projects.
Currency code and exchange rate
Enter the Currency code and Exchange rate. If your Kashflow account and ShopWired account are both transacting in UK £, then you can configure GBP for the currency code and 1.0 for the exchange rate.
Landed cost calculator
If you are using the Landed cost calculator app to calculate customs & duties for orders from customers in the US, the Kashflow app will automatically export the calculated customs & duties and any uplift amount as separate line items on the invoice.
Account settings
Account settings
In the app configuration page, configure each of the available settings (each setting is explained below) within the Account settings section to determine the Kashflow accounts that each part of the invoice is allocated to.
Payment account
Select the account that corresponds with the account on Kashflow that the product portion of sales invoices should be allocated to.
Shipping account
Select the account that corresponds with the account on Kashflow that the delivery portion of sales invoices should be allocated to.
Rounding account
Select the account that corresponds with the account on Kashflow that any rounding adjustments (for VAT calculations) on sales invoices should be allocated to.
Customs & duties account
Select the account that corresponds with the account on Kashflow that the customs & duties portion of sales invoices should be allocated to. (The accounts available will be limited to Revenue Accounts.) This setting is only relevant if you have installed the Landed cost calculator app.
Customs & duties uplift account
Select the account that corresponds with the account on Kashflow that the customs & duties uplift portion of sales invoices should be allocated to. (The accounts available will be limited to Revenue Accounts.) For details about uplifts, see the app settings section of the Landed cost calculator help guide.
Using product account codes with Kashflow
Using product account codes with Kashflow
The Kashflow integration allows you to control which Kashflow sales (nominal) code each product line is assigned to on exported invoices.
By default, all products are assigned to the payment account selected in the Kashflow app settings. Using a product custom field, you can override this on a per-product basis.
You must create a product custom field with the label kashflow_account_code. Once created, enter a Kashflow sales code value into this field on the product.
Enter the Kashflow sales code shown in Kashflow, for example 100 for Sale of goods. Do not enter the internal Kashflow account ID. The system will automatically convert the sales code you enter into the correct internal account ID when exporting the invoice.
When an order is exported:
- The product line will be assigned to the matching sales code in Kashflow
- The invoice line will show the correct account, description, and SKU
- Other products without the custom field will continue to use the default payment account
Payment settings
Payment settings
When payment is made for an order on your website, ShopWired can automatically create the payment in the appropriate Kashflow that corresponds with the payment gateway used to place the order.
Orders placed using the offline payment method will never be exported with payment information and will always export as awaiting payment.
When not selected, all invoices will be created on Kashflow as awaiting payment.
To export payments to Kashflow:
- Select the
export paymentsoption - Select a Default Kashflow bank account from the list of Kashflow bank accounts - payments will be exported to this account if you have not configured an account specifically for the payment gateway
- From the Payment method name setting, select each of the payment gateways in use on your ShopWired website and the corresponding Kashflow payment method and Kashflow bank account that the payment should be exported to
You can add as many payment methods as you need.
Export payments for orders with "shipped" status
Select yes for this setting to export an order's payment when the order's status is changed to one that corresponds to the shipped .
ShopWired Payments
ShopWired Payments
ShopWired Payments does not have an automatic bank feed into Kashflow, but the functionality available through the Kashflow app that of a bank feed.
To export ShopWired Payments fees:
- Select the setting Export Shopwired Payment fees
- Select the ShopWired Payments bank account using the Kashflow account setting
Exporting orders
Exporting orders
Exporter Settings
To enable the Kashflow app to begin exporting orders from ShopWired, select the enable the exporter option.

Virtual terminal and payment link transactions
Virtual terminal and payment link transactions
Virtual terminal and payment link transactions taken through ShopWired Payments are supported by the Kashflow app. When a transaction is created using the virtual terminal or a payment link, the app will:
- Create a payment in the Kashflow bank account you have configured for ShopWired Payments
- Optionally create a separate fee entry if you have enabled the option to export ShopWired Payments fees
Virtual terminal and payment link transactions do not create orders in ShopWired, so they will not appear in the order export sections. They are exported directly as payments instead.
For more information about how these transactions work in ShopWired, see:
Virtual terminal contact details in Kashflow
Virtual terminal transactions do not include customer contact details in the ShopWired Payments API. In Kashflow, these payments are exported as other payments against the bank account you have configured.
Export on Demand
Export on Demand
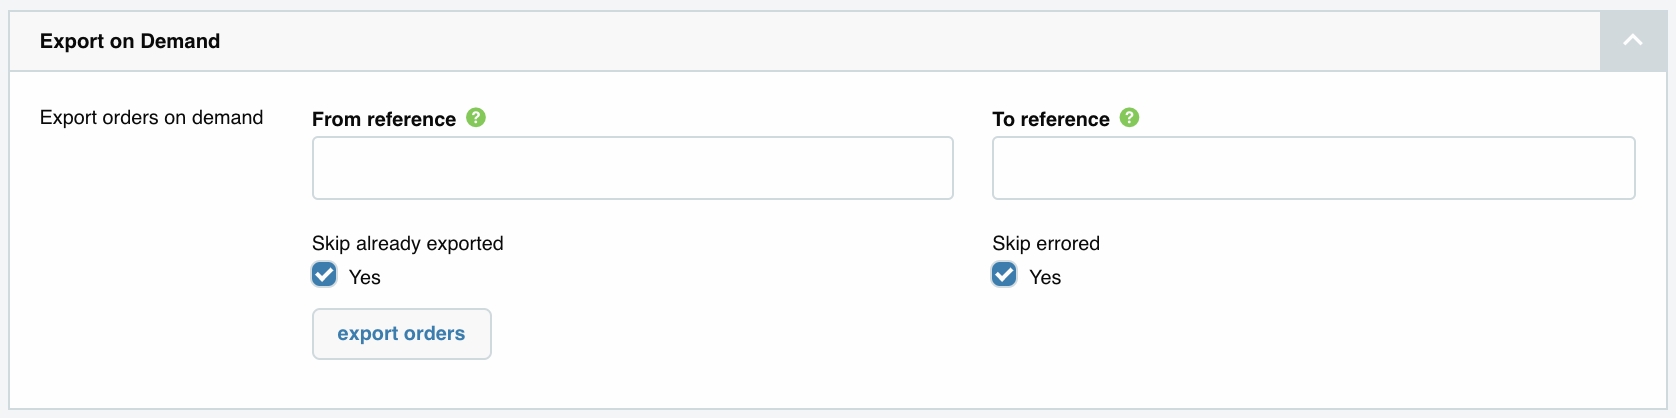
Use the Export on demand section to manually export a set of or all of your orders. Orders can either be exported by date range or order reference range.
- Enter an order reference (into the From reference option) or start date (into the From date option) to select the first order to export
- Enter an order reference (into the To reference option) or end date (into the To date option) to select the last order to export
- Select the
skip already exportedoption to not export orders the app has already exported - Select the
skip erroredoption to not export orders that have previously failed to export due to an error
Refunds
Refunds
When adding a refund to an order on ShopWired, the Kashflow app will:
- Create a credit note for the refund amount
- Credit the credit note with a reference that corresponds to the order reference on ShopWired
- Create a 'spend money' transaction on Kashflow on the Kashflow bank account that corresponds to the account configured for the payment gateway
- Refunds are created irrespective of the payment method for the order
To export refunds, select yes for the Export refunds (this will create a credit note in Kashflow and create a refund on the original payment) setting.
Export errors
Export errors
From time to time, the app may encounter an error when trying to export an order from ShopWired to Kashflow.
The app provides a list of orders that have failed to export in the Export errors section.

For each order that fails to export, the error returned by the Kashflow system will be displayed. You can then attempt to fix the error on the order (e.g. by editing the order or editing the Kashflow app settings) and retrying the export.
You can use the Error notification email settings setting to select to receive an email when an order fails to export due to an export error.
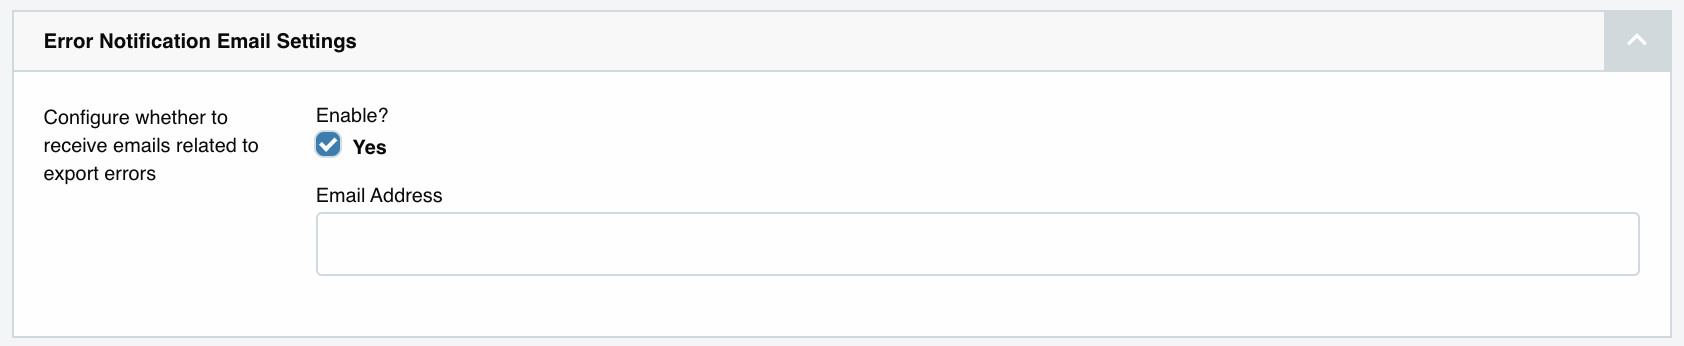
Once you have entered an email address, select save changes.
Contact matching
Contact matching
When orders are exported from ShopWired to KashFlow as invoices, the app uses a contact matching process.
This means it first checks KashFlow for an existing contact using the order’s billing email address. If a matching contact is found (a customer record on Kashflow with the same email address), the invoice is linked to that contact. If no match exists, a new contact is created automatically.
KashFlow’s API only allows reliable matching by email address, so other fields such as name or company cannot be used for this purpose.
Creating a contact in KashFlow
If no existing contact can be matched by email, the app creates a new contact as follows:
- If a company name is present on the order:
- Name is set to the company name
- If no company name is present:
- Name is set to the customer's name